Thursday, December 1, 2016

Edible Nativity

Above is the 2017 version, because we did this again it was so much fun last time!
We used marshmallow fluff for the frosting this year, and it worked pretty well. Also gum drops instead of spice drops (a big flavor improvement!). 


Isn't this adorable????

I got the idea from a Pinterest post: https://www.pinterest.com/pin/458241330819541693/

I changed a few things, but not a lot.

I have a PDF file that includes instructions for building the nativity, supply list, some pro tips (i.e., if I do this AGAIN, next time I will know to.... lol!), a spiritual lesson, and a nativity picture that the girls can color/keep after they eat their nativity.

Get that file here: https://drive.google.com/file/d/0B9ltWADMnsx7S091QzI3TGJnQ3M/view?usp=sharing

This activity was a ton of fun, and I was able to fit the lesson and building of the nativity into an hour.

Mind you-- I had seventeen girls in attendance (SEVENTEEN!!!!), but also had 7 adults on hand to help. The ratio of 1 adult to 2-3 girls was just about right. The older girls did a lot on their own, but everyone needed help at some point.

If you have a 90 minute activity, GREAT. The longer these set before being moved, the better. I would advise having a Christmas video on hand to watch and some Christmas (spiritual) sing along music available to fill extra time. The girls can also color the nativity picture if extra time is available.

I sent the picture home. No one had time to color!

Royal icing is a MUST. I tried this with buttercream, and it was huge fail. Store bought canned icing would definitely NOT work. You will need powdered sugar, meringue powder, water, and a good strong mixer to make Royal icing. It does not take long to make, but does need to be kept covered as it starts to harden/dry very quickly.

Saturday, November 19, 2016

Manners Can Be Fun!

There is a great book called "Manners Can be Fun" by Munro Leaf.
https://www.amazon.com/Manners-Can-Fun-Munro-Leaf/dp/0789310619/ref=sr_1_1?ie=UTF8&qid=1479584363&sr=8-1&keywords=manners+can+be+fun

This is a simple, but fun, book about various kinds of manners, including: being a guest, sharing, treating others' possessions with respect, and more.

It does not have a lot in it on table manners, but is a good primer to talk about manners in general. Manners are treating other people in a civil way. Manners help us get along with others.

In the Faith in God booklet, under Serving Others there is a requirement that says: Learn about and practice good manners and courtesy.

So our activity was fairly simple (and delicious!)

First we had a short, interactive conversation about how manners are different in different places. In America, burping at the table is considered rude. In China it is polite! In America we shake hands to say hello, or greet a new person. In Japan or China you might bow. In Argentina you might give a kiss on the cheek or a hug. If you kissed a new acquaintance in Japan you would be considered very impolite, while in Argentina this would be expected.

Good manners include accepting that not everyone always displays good manners. We MODEL good manners, and parents and teachers TEACH good manners.

I read the Munro Leaf book to the girls, and we talked briefly about a few of the ideas in the book.

Then we got to the hands on part of the activity:

I brought apple slices, crispy m&ms (because they are round and roll), a plate of chips and a cup of salsa, and a plate of cookies.

We practiced some practical, every day table manners/sharing food manners.

The apple slices provided an excellent way to practice knife and fork skills. I demonstrated proper knife and fork skills, explaining as I went, then let the girls try it. They speared the apple with the fork, sliced off a bite sized portion, laid down the knife, switched their fork to the other hand and ate their bite sized piece. They got to practice this several times.

We used the Crispy m&ms to practice NOT using our fingers to put things on our forks, but instead using our utensils properly to capture challenging foods.

The chips and dip were used to discuss two different things:
1. How many people are sharing a certain food? Adjust the portion you take to make sure there is enough for everyone. If you grab a HUGE handful of chips there might not be enough for others to get even ONE chip. It is better to go back for seconds than take to big of a first portion.

2. Food sharing to be careful of germs.

  • Take the chips you touch. Be careful not to touch a lot of chips!
  • Either put a small portion of dip on your plate, or ONLY dip your chip in the dip ONE time. No double dipping!

The girls really enjoyed practicing (and eating) good manners!

I also used this printable that I found on Pinterest, and made one for each of the girls:
https://www.pinterest.com/pin/458241330816095772/


Sharing Gratitude/Making Cards


This lesson fulfills the following Faith in God requirement, under Serving Others:

  • Write a letter to a teacher, your parents, or your grandparents telling them what you appreciate and respect about them.

This was a November lesson, and during Thanksgiving season we often talk about blessings and gratitude. (Much like we often talk about Christ during Christmas!) Obviously, gratitude should be something we strive for in our daily lives, NOT just on a thankful holiday. 

Most of us are aware we have blessings, but we rarely stop to consider them.  Most of us know we have loving people in our lives, but we rarely think of expressing our appreciation beyond a simple verbal "thank you."

Why is that? 

Before we talked about writing notes of appreciation to our parents, teachers, etc. I wanted to talk to the girls about WHY gratitude has to be a conscious choice/decision we make daily. 

I have included all the information below, as well as some the card printable templates in a PDF file that you can download from here: https://drive.google.com/file/d/0B9ltWADMnsx7dFR3OHlCRmFYaVE/view?usp=sharing


This file includes the lesson, directions for the cards, a template to print the card text, and an example thank you note the girls can fill in (to make writing the cards easier!)


Lesson: The Busy Brain

Could you, right now, tell me how many rooms are in your house? Probably not INSTANTLY tell me, but if you thought about it, you could likely me tell the right numbers.

This is an example of how our brain works. Our brain knows, but yet it doesn’t know instantly, all the things we know. This is because Your brain is always very busy.   

Your brain does many different things all at once: It helps you feel emotions and physical sensations like temperature, and touch. It sorts out smells and sounds, helps you move different parts of your body, helps you talk and think, all at the same time! So it’s no wonder it can’t tell you instantly how many rooms are in your house. It KNOWS, but before you can access the information you have to STOP and THINK.

Our brain, because it has so much to do, takes shortcuts. 

If something is normal, or common, our brain doesn’t take too much time to think about it. So if something nice happens to you every day, soon your brain won't even notice it!

Let’s think about an example of this:
When you flip a light switch, you expect the light to turn on. If it does, you don’t think about it at all

Only if the light DOESN’T turn on will your brain notice! 

When the power goes out, light switches don’t equal light. The computer doesn’t work, the TV doesn’t work, the heat or air conditioning don't work either. And what if it’s night time???? Now everything is scary and different and we have to find candles to go to the bathroom! When this happens our brain keeps thinking about how great it would be for the electricity to be back on!

When the power comes back on we're excited!

But very soon… our brain is used to having electricity again and it stops thinking about how great it is to turn on the light switch and have a light come on. We go right back to not thinking about it AT ALL! When it's gone, we miss the blessing. When we have it, we don't think about it much!

Does that seem right to you? To not think about our blessings?

We CAN think about them, if we choose to. But it takes effort on our part.

When we take time to stop and recognize and appreciate our blessings it is called gratitude. Things that make our lives pleasant, better, lovely, cheerful, healthy, etc. are our BLESSINGS. 

Gratitude takes time!

This is one reason why, when we say our prayers each day, if we are wise and obedient, we should begin by thanking Heavenly Father for our specific blessings. We can easily think of many things each day to be grateful for, from food being in your fridge and cupboard, to your mom waking you up for school, to your school building being warm in the winter and cool in the summer. Focus on different blessings each day as you pray, and you will be amazed at how many you have!

So... what are some things we are blessed with? Some things (big or little) that we are thankful for? 
{Let the girls think and answer for a few minutes and list answers on the chalkboard…}

Guide toward families: Think about some of the things your parents do for your family. Think about some things your grandparents do. That your siblings do. List some.

Think for a minute, does someone in your life bring you many things you are grateful for? 
Who is it? Do they KNOW you are grateful? Do you tell them? Sometimes it is nice to share our gratitude with those who help and love us.

Activity:
Tonight we are going to make a card (or two —depending on time) and that will be fun. But what is important is that we will use these cards to write a special, specific note of thanks to someone who blesses our lives.

~ What does specific mean? Discuss i love you/you're awesome (nice but not specific) vs. I appreciate bed time stories and that you go to work every day for our family. I love it when we play tickle fights and squirt gun wars. I appreciate that you help make dinner and tell me jokes.
This can apply to our prayers too: I thank thee for this day vs. I thank thee that I got to play with my friends, and have fun in school

Gather supplies and make cards!

I chose a sky blue card stock as the main material for all the cards, as it would show multiple colors of ink easily (for the writing inside) and make a nice background— I thought white would be too stark and require additional supplies to “liven up.” I felt like I could even have gone with a lighter blue, better too light than too dark!

Card Directions:

  • Both cards are VERTICALLY CUT— they do not open like a book
  • Print the last page with the “you uplift me” and “Thank you” texts, if desired. 
  • Cut each 8.5x11 piece of card stock in half the long way, so you have two 4.25x11 inch pieces. Fold in half so each card is 4.25 inches wide by 5.5 inches tall. 
  • Have envelopes for the cards! You can purchase these at Walmart or Staples.
  • Have the girls gather the supplies for their cards BUT write the inside message before assembling the cards.

Flower card
  • Punch or cut 5 heart shapes or petals. Glue onto the card front with a small amount of glue.
  • Button: OPEN THE CARD before piercing the paper for the button holes.  Use a paper piercer or needle over a doubled piece of card board to pierce the (OPEN) paper where the button holes are, to make stitching easier.
  • When tying on the button, come in from the TOP/outside of the card and go through the button, and do the stitch on the inside of the card and back up through the other button hole. Thread is now ready to be tied in a bow.
  • Paper “ribbon” strip: cut a piece of patterned paper or card stock 6 inches long by 1/4 inch wide.  Adhere to the front of the card (4.x25 inches wide) and cut of the extra to form the little “bow” pieces. Adhere. 
  • Add small heart punch between the leaves (optional— but fun!)
  • White “stitching”: use a white gel pen. They are more contrasting/easier to use than white colored pencil. Hold the gel pen in contact with a scrap piece of paper and let it build up the gel before starting. Draw each line slowly, and you may need to retrace pale lines. Draw stitches in about 1/4 inch from each edge of the card.

Balloon Card
  • Cut or punch 7 heart shapes
  • Cut three threads (leave them a bit longer than needed and trim at the end)
  • Add one thread under the top balloon, and under one of the next top balloons. Add the third thread to one of the lower side balloons, and make sure the bottom balloon covers all three threads.
  • Tie the threads with a thread bow.
  • Trim extra length from threads as needed
  • Add the white “stitched” border with a white gel pen
Supplies for each girl
  • button
  • friendship thread (thick thread or embroidery floss), enough to tie the flower button bow, the balloon string bow, and do three balloon strings
  • needles (that will hold the thicker thread)
  • white gel pen & black or other colored pen for writing
  • Patterned or colored paper for bottom strip embellishment
  • colored paper heart punches (7 for balloons, 5 for flower)
  • small heart punches for stem decoration
  • card stock base (2— 1 Thank you and 1 You Uplift Me)
  • 2 envelopes

Supplies to share: scissors, glue, paper piercer (optional), cardboard (optional) 

Thursday, October 20, 2016

Seeds of Faith


This is far from an original idea, but that is because it is a WONDERFUL idea for Activity Days!

Christ often taught with parables, and often used the idea of seeds in those parables. Alma spent a long, long chapter on how faith is like a seed. All the things he taught, about how faith and testimony must be nurtured and cared for (like a seed!) are still true.

The growth of testimony requires scripture reading, prayer, church attendance, a personal commitment to choose the right, and a desire to follow the Lord. A once strong testimony may wither and fade if it is not cared for and strengthened by daily care.

This is definitely like a seed! A seed is easy to plant and quick to sprout. But it takes careful care to get from sprout to full fledged flower (or carrot, or mustard tree!).

The goal of our activity was to help the girls identify the testimony they already had, help them understand how their testimony could grow, and encourage them to do those things that would encourage growth daily.

Of course, the activity also had to be fun! :)

During a Primary Sharing time we had all the kids trace their hands on card stock, and then color them. I took them home and cut them out to make the flower petals for the bulletin board. We had the kids trace two hands, and I think one hand would have been plenty, just FYI!

During our activity we did the following:
Let the girls color a label for their seed container
Plant a seed from a choice of flower seeds
Read scriptures on faith and testimony
Wrote testimonies on paper flowers, then colored the flowers

The flowers of testimony were added to our bulletin board, and it looks great! The girls love seeing their testimonies shared. We put names on the back of the flowers only, and will give them back to the girls when we take the bulletin board down.

The details:

We had about 12 girls attend this activity. We used 2 liter bottles (clear soda bottles) cut so they were about 6-8 inches tall to hold the dirt/seeds.

We had one large bag of potting soil and one bag of pea gravel and we had left over amounts in each bag, so unless you have a TON of girls, one bag is plenty. The pea gravel goes first, then is covered with dirt to help drainage.

We used strips of poster board (because paper/card stock was not long enough to wrap around the bottles in a single strip) to create a wrap around label that the girls could color to decorate their planter.

     You may think, as a few of the girls did... why use poster board? Why not just use the markers to color directly on the plastic? Answer: because this looks great when your container is empty, but once you fill it up with dark soil... you can't really see your design any more if you color directly on the bottle.

Supplies:
Pre-printed paper flowers, on white card stock (the flowers were about 8x8 inches in total)
posterboard strips, about 6 inches high
markers, LOTS of markers
Tape (to tape the strips together and to tape the strips to the bottles)
Flower seeds
Potting soil
Pea gravel
scissors (for cutting out the flower)
Pens (For writing testimonies)
Scriptures (John 20:24-29; Hebrews 11:1)
2 liter bottle, cut basically in half, one for each girl

In terms of timing: our activities have gone from 90 minutes to 60 minutes.
We let the girls look up their scriptures and discuss them in small groups, with a leader in each group, then share what our scripture was and what we learned. That was about 15 minutes.

Then we discussed the care of seeds, and drew parallels to the care of faith and testimony.

Then we colored our seed container poster board strips. Once the strips were done the girls got pea gravel, dirt and a seed. That part (the seed/dirt part) took a VERY short time. The coloring part took a lot longer.

Then we talked about the seeds of faith we were starting with and what our testimonies were. We asked the girls: what do you believe about the gospel? Maybe it is very simple. Maybe you believe God exists. Maybe you believe God loves you. Perhaps you believe you will be with your family again after you die, or that Joseph Smith is a prophet. Maybe you believe the Word of Wisdom will keep your body healthy and your spirit strong. Maybe you believe Thomas S. Monson is a prophet.

Think about it: what do you believe, right now? That is your testimony. It can grow as you read the scriptures and come to church. Then they wrote their testimony on the flowers. We asked them to write FIRST, color second so that 1) any coloring would not cover up the words and 2) coloring can take a looooooonnnnggggg time, we wanted to make sure the testimonies got written!

Then they cut out their flowers. We were doing this for the bulletin board. If you are just sending the flowers home with the girls they would not necessarily need to be cut out. Or they could be cut out and placed on the poster strip of the plant container if the girls were keeping them!


Thursday, October 13, 2016

Sensory Safari

In Primary this year we have learned a lot about our body being a temple. Our body is an amazing creation-- it can do so many wonderful things! 

The idea for the Sensory Safari came from this article in the Friend:
https://www.lds.org/friend/2016/07/happy-sabbath?lang=eng

We had a lesson, then one activity for each of our five senses. Because our activity time has been reduced to just 60 minutes (down from 90 minutes), and because we had 11 girls in attendance, we needed all our time-- and even a few minutes extra!

Lesson: Our spirits wanted a body, because bodies are AWESOME!


There are many things that a person with a body can do that a spirit cannot: we can eat, sleep, touch, smell, and so much more! Our spirits were VERY excited to be able to do these things. Our spirits knew a body would be a special gift; now that we are here on earth we need to appreciate and take good care of our body.

This is what the scriptures teach us about our body:
1 Corinthians 3:16 
What do we learn from this verse? (Our body is a place for our spirit to live. Our body is a temple.) 

Heavenly Father knew getting a body would be special to us. He created this world with many wonderful things that our bodies could experience. He gave us things to touch, taste, hear, see and smell that are beautiful!

There is a song that we sing about our beautiful world on page 228 (have 2 or 3 songbooks for the girls to share) in the Children’s Songbook. 
What is the name of this song? (My Heavenly Father Loves Me) 
Why do you think they chose this for the name?  
Let’s read the words, and listen for the different kinds of things that Heavenly Father created to make the world beautiful to us. (Let the girls read the words aloud)

We know Heavenly Father created  our bodies, and He wants us to both enjoy them and care for them. The prophet and other church leaders teach us to keep our bodies clean and pure. Look at the back of your FIG book, at the “My Gospel Standards”: 

“I will keep my mind and body sacred and pure, and I will not partake of things that are harmful to me.” 

What kinds of things might be harmful to our body? (Drugs, alcohol, tobacco)
It is also good to keep our bodies clean (physically, like with soap and water), to eat healthy foods, to exercise and get the sleep we need.


Tonight we want to focus on some of the amazing things our body can do! So we are going to take a sensory safari and explore all five sense: sight, touch, hearing, smell and taste. As we do, let’s return grace and thanks to God as we experience all he has blessed us with!

-----------------------

Sight: Close your eyes for a minute. Imagine experiencing your whole world without the gift of sight. 

Without our eyes it would be very hard to read, to walk around without running into things, and even do simple things like pick the right cereal box! 

Our eyes can see things far and near. They can pick out patterns and colors. They can even help us find things that are hidden. If you’ve ever seen an airplane far up in the sky, or looked closely at the beauty of a butterfly, or seen how interesting the texture of a piece of bread or block of marble is, you know your eyes are pretty amazing. 

Your eyes convey a great deal of information to the brain, and even things that WANT to stay hidden can be detected by a careful observer if we look closely enough. Let’s test our eyes with this hidden picture!

Do a hidden picture page from the Friend. Have one copy, and one highlighter per girl http://media.ldscdn.org/pdf/magazines/friend-september-2010/2010-09-18-we-love-family-home-evening-eng.pdf

Smell: Our sense of smell is so important! Not only is it great to smell nice things like flowers and cookies and fresh baked bread, our nose can warn us of danger! Like if we smell smoke, or a chemical smell. Maybe you have even smelled something stinky and thus have avoided stepping in dog poo!

See if you can identify these different smells. 
Set up: Place the liquids as far apart as possible on the table (so the smells don’t collide); let the girls smell each container and try to identify the liquid inside by its scent.

I used clean baby food jars, and different clear liquids with distinct scents
I numbered each container, and had a numbered brown paper bag behind each bottle that contained the item: water bottle, vinegar bottle (water down the vinegar a bit!), mint bottle, soda bottles... it is a fun reveal at the end as you show what is inside the bag!

Give each girl a paper with the possible scents written down, and a pencil
Girls write the NUMBER by the word which identifies it (berry soda, 3; vinegar, 1, etc.)

I had the girls identify vinegar; water; berry flavored clear soda; pineapple coconut flavored clear soda; orange flavored clear soda; water w/ mint extract in it

Hearing: We can identify many different varieties of sound, soft sound, loud sounds, the beauty that is music. You can recognize a person by their voice, and everyone has a different voice! How amazing is that? If you spend a minute to listen, even in a quiet room, you can often hear small noises: a fly buzzing, or a fan running, or even the sound of your own breathing. Take a minute to just quietly listen for sounds in this room… 

Our ears can tell us a lot if we use them, so let’s put them to the test and see if you can match up these different sounds!

Set up: Use a lidded, opaque container (such as old film canisters, m&m Minis tubes) and make pairs of tubes with matching interior objects such as: a teaspoon of rice (in 2 separate tubes), a teaspoon of salt, a few coins, a pencil eraser, etc. 

Give one tube to each girl (making sure that each tube has a partner passed out— a leader may need to participate if you have an odd number of girls), and have them shake the tube. By listening to the different sounds, the girls should be able to find the matching tube (that contains the same interior object)

When the girls discover the matching tube have them sit down next to their partner. When everyone is seated, let each pair shake their tubes to show the matching sounds.


Touch: Our sense of touch can tell us about danger, like if something is hot or sharp. It can be pleasurable, such as when we receive a hug, or feel something soft and fuzzy. We can learn a lot about an object by touching it. 

What can we tell about objects with our sense of touch? Let’s explore.

Set up: Have the girls sit in a circle with their eyes closed; pass around different objects;
without opening eyes, talk about what we can tell about each object…

Remind the girls to keep their eyes closed until they've had their turn. To facilitate passing, say “pass” after each girl has had a few seconds to explore the object. 

Discuss: Even if we cannot see something, if we can touch it we know if it is:
Rough/smooth
light/heavy
wet/dry
hot/cold
We might also be able to tell the shape/size


What are some things you like to feel? Silk? a fluffy kitten? small pebbles? grass?
Pass around: a sticky toy, a large rock, playdough, a cotton ball, an ice cube 

Taste: Our mouth and tongue do some wonderful things. We can appreciate all kinds of flavors and textures. Sweet, creamy ice cream or yogurt. Crunchy salty potato chips, or almonds, or cinnamon toast. Juicy fried chicken or a grilled hamburger. Cool, crisp watermelon or apples or pears. Ooey gooey chocolate chip cookies. Even sour lemons, and broccoli! Does anyone else want a picnic now??? :) If we had a picnic, what would you bring?

If there is time, let the girls share a favorite food.

Our eyes and our nose often help our sense of taste along. But even without our eyes, and without a strong smell, our sense of taste can give us a lot of information. Let’s see how smart YOUR sense of taste is!***

Set up: Give each girl a piece of paper with the different types of Cheerios listed on it. I had  Fruity Cheerios, plain, Honey Nut, Chocolate, Apple Cinnamon and Pumpkin Spice.

Place a dixie cup in front of each girl. Pour the same type of Cheerios in each cup while the girls have their eyes closed. I gave each girl about a tablespoonful each time so they could get a good mouthful.

The girls pick up their cup, (eyes closed!) and pour all the Cheerios into their mouths. They can they open their eyes, assess the flavor and mark their card. They should place a number one by the flavor they think they tasted first, a two by the flavor they think they tasted second, and so on.

It's best for the girls to make a choice about the flavor before they go on to the next round of Cheerios. They can go back and adjust later if they want to.

*** Explain that eyes have to be closed because it is a TASTE test and seeing a dark brown cheerio... well you know that's the chocolate one with zero tasting. Obviously the girls COULD easily peek... but there isn't a prize for winning. This is just to test how good our mouth is at distinguishing flavors. Peeking will just wreck your chance to see that. So don't cheat!

Do all the rounds, and then go back and reveal the answers/have the girls check and see how well they did. 
------------------

And that's all five senses! The girls really enjoyed each game and had a lot of fun at this activity. Be sure to close with your testimony, and bring back the idea that we should thank Heavenly Father for the marvelous gift that is our body! 

We can show our appreciation through prayers of thanks, but also through taking good care of our body, and treating it respectfully as the temple that it is.


Friday, September 23, 2016

Friendship Bracelets


The start of another new school year means it is time again for a lesson on valuing others and making new friends!

I based our lesson on this Pinterest post:
https://www.pinterest.com/pin/458241330812794990/

{an acronym of the word Friends, with the letters standing for different aspects of respect and friendship.}

I also included in the lesson the idea that all people are our Heavenly Father's children, and our brothers and sisters. Christ had one rule for everyone and that was: love one another as I have loved you. So we have the opportunity daily to treat others with kindness and dignity and that should be our basic goal.

I hid the little cards shown in the Pinterest post around the room and had the girls do a quick search for them, then we discussed each aspect briefly, in order, and stuck them up on the board.

Then we made friendship bracelets!

Thank you Pinterest, for making my life easier! We used the method highlighted here (great pictures on her blog!): https://www.pinterest.com/pin/458241330816051481/

Once you get the hang of it, it goes really fast and many of the girls were able to get a bracelet halfway completed, one or two got theirs all the way done. Also one or two left with only an inch or so finished, but those were the ones doing a lot of chatting! I heard from many parents that bracelet weaving continued at home and many extra bracelets were made!

MUSIC made this super enjoyable. We played some favorite tunes while we were weaving, and it was a fun and relaxing way to spend time together.


I put the instructions on index cards for the girls to take home. You can download a PDF of this file here:


I made a few tweaks to the method shown in the Pinterest post above. They really helped with the speed of the project.

The first improvement I made was to change the circle from cardboard to craft foam.
  • The original card board circle (which I made first) was stiffer and easier to hold, and made a "tighter" weave  to the bracelet... BUT it had the major flaw of catching and snagging at the thread each time you moved it. 
  • The foam circle was easier to make (to cut the center hole, I just folded it in half, did a small snip, folded it in half the other way, snip, and that little plus shaped opening was perfect to hold the strands), plenty easy to hold, and, although it did result in a slightly looser weave, it was overall not a noticeable difference. Add to that the foam caused ZERO SNAGGING, and we had a winner!
The second improvement: add numbers to the circle.

  • This meant that instead of turning the circle each time, or counting over each time, you could just memorize the sequence. SPEED. 
  • Also, one some circles, I added a secondary number to make it FOOL PROOF (if slot 8 is empty, get the tread from slot 5). Some of the girls really liked this, and some found it confusing. Which slot am I on? 8? or 5? So I mixed methods and put the slot sequence on the BACK of the wheel (for reference if needed) and left the front with just the slot number. The girls who wanted to add the secondary number could easily do so. 
  • Number sequence: (the first number is the empty slot, the second number is the slot you lift the thread from) 8, 5; 5, 2; 2, 7; 7, 4; 4, 1; 1, 6; 6, 3; 3, 8


As a non-expert weaver I really liked this method. For several reasons:

  • You can put down your weaving at any time and it stays in place, PLUS you always know what comes next... no trying to remember which thread you are on
  • It was simple to demonstrate/explain to the girls. After just a few times of going through the method together everyone understood it.
  • It is very FAST if you memorize the pattern, but doable even if you don't bother and go slow
  • It limits your supply needs, with only seven strands of floss needed per bracelet. I thought the bracelets looked best with 2-4 colors, meaning some strands were the same color. You COULD do 7 different colors, but it just looked really busy.


To be fair, there were a few downsides as well, namely:

  • It creates a fairly slim bracelet, and there isn't really a good way to make it thicker
  • Your pattern changing ability is limited to either multi colored (random) or two colored stripe


Thursday, September 22, 2016

Article of Faith Olympics


This was a pretty big activity because there are 13 Articles of Faith. That meant 13 stations, and that meant 13 adults were needed.

We needed the whole gym for the set up, and if you don't have at least 10 girls... I would consider inviting the Cub Scouts to join you for this activity to make the set up time and adult participation "worth it."

It would have been super awesome if I had remembered to take pictures of this fun night... but... I had a few people not show up-- and therefore last minute "aaaaaggghhhh!" going on-- and I didn't. I do have pictures of most of the games though, down below.

Couple of things... 

Memorization: I told the girls starting about a month out that the Article of Faith Olympics was coming up, and that IF (if!) they memorized the Articles of Faith, they would be elite competitors who would have an advantage. This encouraged the girls to be thinking about/trying to memorize the 13 A of F (which they should be doing anyway!) and it was a great way to get them excited about it.

I made the "elite competitor" part true by leaving a score card space for memorization. If the girls had the Article memorized they got 3 extra points for it.

Using the Articles of Faith: Since it was an "Article of Faith" Olympics... you had to say the A of F at each station. For non-memorizers we had the poster board size A of F at each station and they read it with the adult before (BEFORE!) they could play the game.

If they had it memorized, the adult would simply flip the card over, and let them say it for the extra points.

Games were just... games: It would have been super cool... beyond cool!... if the games had to do with the meaning of the Articles of Faith, or were in some way related to them. But they did not. If this makes you sad, I understand! It's okay! Feel free to make up games that do relate to the themes in each Article of Faith and use those instead!

These games are just a mish mash of different ways to have fun for 8-11 year olds! Their defining characteristic is they were pretty easy to put together. When you are doing 13 games, easy is important!

Set up: Took about 90 minutes because I did it alone. Take down, with all the adults helping took about 10 minutes. Plan accordingly! Don't get there 20 minutes early to set all this up or your activity will not happen! Just dragging in all the tables from other rooms in the building will take you 20 minutes!

We still had a lesson: Because why DO we memorize the Articles of Faith??? I thought that was important to talk about! The lesson lasted about 5 minutes, and then the girls played the games.

Winners: I did make a prize for everyone, but I felt like that was optional. I could have just announced who had the most points with no prizes. But the girls (of course) did like getting prizes at the end. If you want to do prizes you could do a variety of simple things from candy Olympic medals, to prize ribbons to certificates. I did a small bag of starburst (about 8 per girl) and told them they were  Article of Faith "stars"!

Here is the lesson I used (VERY SHORT!):
Why do we memorize the articles of Faith?


They teach us about the gospel.
They can help us share the gospel.
They are a good guide when someone wants to know, “what do you believe?”


Along with the Articles of Faith we have the “My Gospel Standards” on the back of the Faith in God booklet.


These simple statements help us see the gospel clearly. They can help us choose the right. They are based on words from the prophets, and from the scriptures.


Tonight we are going to say ALL the Articles of Faith. You will say one at each station before you play the game.


I hope the games are fun! I also hope you have at least a few of the Articles of Faith memorized, because if you do, you will get extra points!

But most of all, I hope that as you say the Articles of Faith that it will imprint on your heart and on your mind. There is much that we can study and learn from them.

Ok... the Games!

For EVERY station the adult helpers had the same instruction:


  1. The girl says the Article of Faith for your station.
  2. Mark her score sheet in your station’s “Said AoF” column. If she had it memorized, mark the “From Memory” column as well. (extra points for her!)
  3. The girl plays your station game.
  4. Mark her card with the points she earned in your station’s Game Points square.


Station 1: Ping Pong Squirt Down: a towel on the wall would have been helpful as it got squirted quite a bit. I did have towels for wiping the floor. One large (2 gallon) bucket was plenty to easily fill the squirt gun for each girl.

Give the girl a fully filled squirt pistol. From behind the line she has 1 minute to squirt down as many ping pong balls as possible. Each ball squirted down = 5 points.


Station needs: A of F #1 card; 5 ping pong balls, holding board, 2 water pistols, timer, pen, water bucket to refill squirt guns, towels, table, chair


Station 2: M&M Transfer
Pour one cup (each contains 25 m&ms) onto a clean plate. Set an additional plate 4 inches away on the table. Give the girl a straw. She has 1 minute to transfer as many m&ms as she can from the first plate to the second plate using the straw. Each m&m transferred to the second plate = 1 point. {The girls may eat their m&ms when they are done with their turn.}


Station needs: A of F #2 card; 16 cups of m&ms (25 in each cup); 16 straws; 32 plates, timer, pen, table, trash can


Station 3: Dice Pop Challenge: I purchased the board game Madd Cap Checkers, Dog Lover's Edition, from Amazon because it came with a three dice popper. Unfortunately the dice were dog bones, not numbers! FORTUNATELY, the popper base easily unscrewed and I substituted regular dice, screwed it back to gather and it worked great!

The player selects a number (1-6). She has 30 seconds to pop the popper as many times as possible. She gets one point for each for each time a die shows her chosen number (up to three points per pop, if all the dice show her chosen number).


Station needs: A of F #3 card; timer, pen, scratch paper, dice popper, table


Station 4: Treasure Dig: this was a big bowl with some old food storage wheat in it (about 6 inches deep). The treasure pieces were just small pebbles with numbers written on them. There were six pebbles total, 2 each for four, five and six points. It is REALLY fun to run your hands through wheat. The girls loved it!

Each girl gets to search the treasure bowl and pull out 2 treasure pieces.  
>NO PEEKING! If a piece is visible, it counts for a score.
>The pieces are labeled with different point values.
>Add the points from the treasure pieces for her score.
>Return the pieces to the bowl after each player’s turn.


Station needs: A of F #4 card; large bowl of old wheat; 6 treasure  pieces with different point values hidden in the bowl; pen, table


Station 5: Perfection Puzzle: the classic board game. I had it in my garage, it was a huge hit! (even with three pieces missing!)

Player starts with an empty perfection board. Set the board for 30 seconds. Award 2 points for each piece inserted correctly before the board pops!


Station needs: A of F #5 card; Perfection game board and pieces, pen, table


Station 6: Guess Who: another classic board game! It is one player, with the adult picking the card and the girl trying to identify which person was picked.
Adult selects a game card from the pile. (Keep the card secret!) The player asks YES/NO questions to identify which card you have. For example: Is the person a girl? Does the person have glasses?


Each player begins this station with 50 points. Deduct 5 points per question needed to correctly identify the card. (the identity question "Is it Sam?" does not count against your points!-- unless you have someone just asking identity... is it Sam? Ed? Pete?... then it would count.)


Example: if the girl asks 6 questions (5x6 =30) her score would be 20 points (50-30=20)


Station needs: A of F #6 card; Guess Who board, Guess who cards, pen, scratch paper, table, 2 chairs


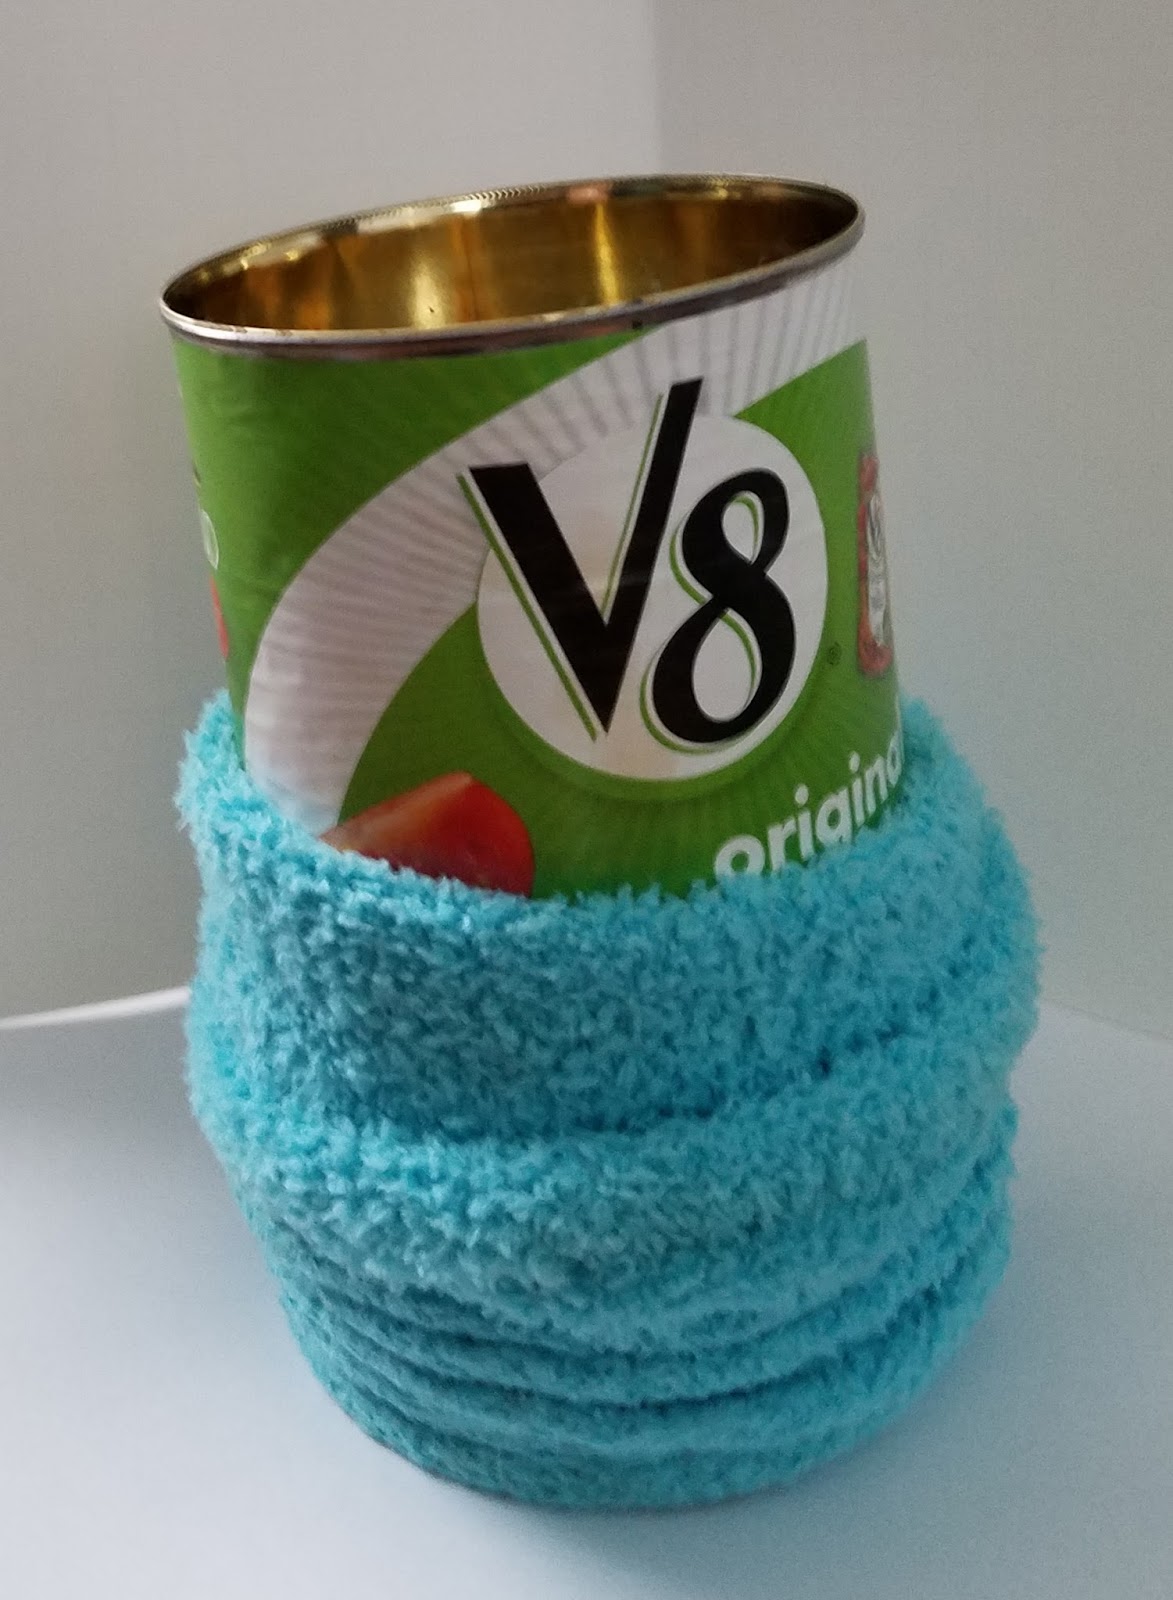
This is basically a clean V-8 can that I opened with a Pampered Chef can opener (no sharp little poke point that way) that I stuffed inside a large, (clean) fuzzy sock.

I placed various objects inside, including a plastic spoon, an unopened tube of chapstick, a die, an eraser, a hair band, etc.

When the sock completely engulfs the can, it leaves a little fuzzy tube the girls can easily stick their arm in and feel around the can. It prevents them from seeing anything, while allowing them easy access to the objects inside. Everyone wanted to play this after and figure out the objects they didn't have time to guess!

Station 7: Touch Detective
Player reaches into the mystery box and feels the objects. When she thinks she knows what an object is she tells you her guess, then pulls the object out. She has 1 minute to identify as many objects as she can. 3 points per correctly identified object


Station needs: A of F #7 card; object box and objects (eraser, chapstick, spoon, nail polish bottle, dice, comb, clothespin, lego, quarter, key, hair band), timer, pen, table


Station 8: Balloon Bustle: I placed the starting basket and the ending basket about 20 feet apart. The girls got an average of 5 balloons into the basket in a minute.

Player begins by placing a balloon on her tennis racket. The goal is to get as many balloons (1 at a time) into the goal basket using only the racket-- NO HANDS.
> Time limit is 1 minute.
>Award 5 points per balloon in the end goal basket.


Station needs: A of F #8 card; 2 baskets, 10 balloons, tennis racket, timer, pen


Station 9: Mystery Taste: We had five plates of fruit cut in very small pieces behind a short wall of hymnals. The girls loved tasting and trying to guess the different fruits. Ask about potential allergies before playing! (We only needed one apple, one banana, etc. because the pieces were VERY small)

Place a blindfold on the player.  Give each player a small piece of each fruit, wait for her to identify it, then give her the a different piece of fruit. Continue until all five have been given (strawberry, apple, banana, orange and pineapple). For each they identify correctly, award 5 points.


Station needs: A of F #9 card, toothpicks, trash can, blindfold, tasting foods, poster board “food shield”, pen, table


Station 10: Bozo Buckets : the buckets are set up in a line, with the closet bucket being 3 points, next closest 4, etc. I did 5 buckets, a stand behind line, and ping pong balls. The balls did bounce out of the buckets in my trial run, so I added a layer of cotton balls to the bottom of each bucket, problem solved!

Give the girl 3 ping pong balls. She gets to throw each ball one time. Each bucket is labeled with points. Add the points from each bucket that has a ball in it.


Station needs: A of F #10 card; five buckets ( with point signs), three ping pong  balls, pen


Station 11: Follow the Dots-- This was an iPad game (free) from the app store. It's name is self explanatory! Using a finger on the screen the girls try to stay on the same track as the moving dots. If they miss, turn over. It has a timed, 30 second mode, which is the mode I used.

Note: Most of the girls scored about 30 points on this but ONE girl scored 285. It threw off the whole Olympics, as with this one game, she basically won the whole shebang. I would set a 50 point cap for the station to keep it in line with the points that can be earned at other stations.

Each player can try 3 times to follow the dots on the timed mode (30 second limit). Take the highest score the girl achieves and enter it on her score card.


Station needs: A of F #11 card, ipad, pen, table, chair


Station 12: Jump Rope Junction
Each girl has 30 seconds to do as many jumps as she can. She must clear the rope with both feet for it to count as 1 jump. Each jump is 1 point.


Station needs: A of F #12 card; jump rope, pen, scratch paper, timer


Station 13: Giant Bean Bag Toss... this was a seat sized bean bag, probably weighed 5-10 pounds, but it was quite large. Most of the girls were able to throw it 12-15 feet, so plan your space accordingly!

Each player throws the bean bag once. Measure from throw line to bean bag. 1 point per foot.

Station needs: A of F #13 card; large bean bag, strip of painter’s tape, measuring tape, pen


Here is the score sheet. I printed them on card stock. Link to download a printable PDF: